

When I first started using Premiere Pro, it was absolutely confusing. And I had an extensive background in Photoshop already, where a lot of the hotkeys overlap with Premiere Pro! In this Premiere Pro tutorial, I’m going to show you:
- A walkthrough what all the panes do in Premiere Pro, and whether they’re relevant for beginners
- What all the basic buttons do, and their hotkeys
- The layout I use in Premiere Pro to edit videos easily
- And what all the sections in the layouts do, in layman’s terms.
This Premiere Pro tutorial is geared towards newbies that are unfamiliar with the software and is not intended to be a tutorial for folks that already know how to use Premiere Pro.
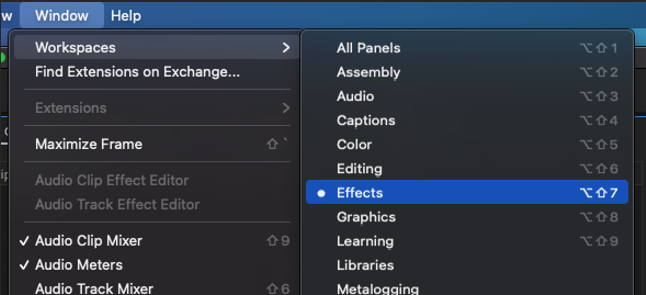
Before we start this tutorial, make sure you’re viewing Premiere Pro in the “Effects” view. Note that this tutorial is for the Mac OS version of Premiere Pro, but the buttons and menus are pretty much the same across Windows/Mac (I work across both frequently and they’re pretty much the same).
Go to Window > Workspaces > Effects.
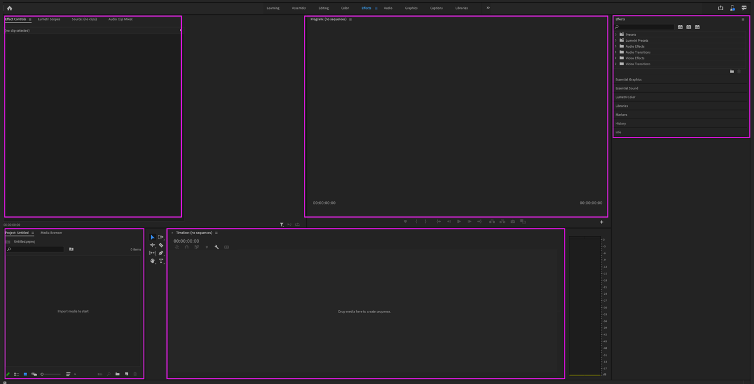
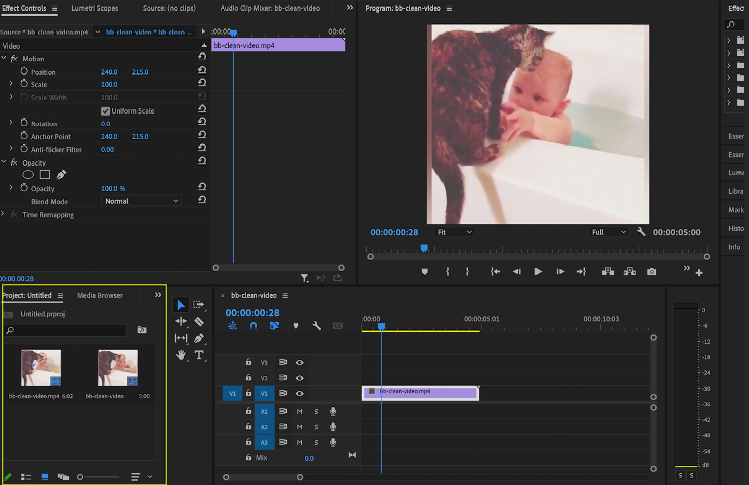
Your window should now look something like this. I’ve gone ahead and highlighted all the different panes. And we’ll go through each of them in each section.
What I’d like you to do in this Premiere Pro tutorial is to go through everything linearly. I’ll walk you through some examples, and by following along, you’ll be able to grasp the concepts a lot more than just reading it.
Table Of Contents
- 1 The Timeline
- 2 Premiere Pro Buttons Mini-Tutorial
- 3 Shrinking And Expand Videos/Fonts
- 4 Mini Premiere Pro Tutorial On How To Modify Your Font / Effects Control Pane
- 5 Preview Pane
- 6 The Project Pane
- 7 The Effects Pane
- 8 Quick Review Of The 3 Most Common Hotkey I Use
- 9 Wrapping Up This Beginner’s Premiere Pro Tutorial
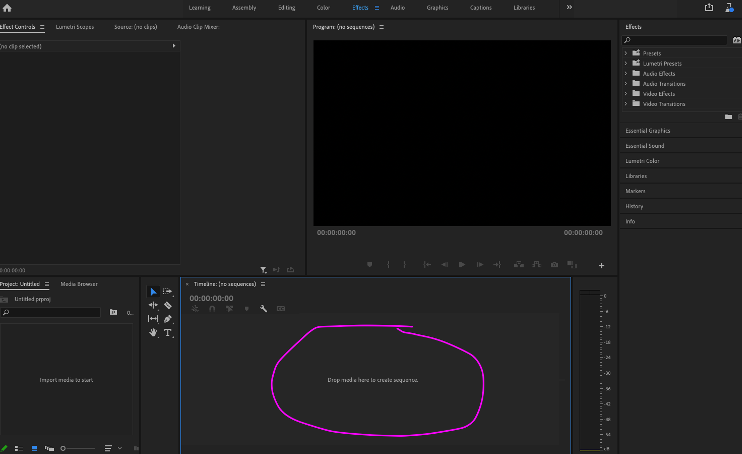
The Timeline
The timeline is this part of the Premiere Pro window:
Go ahead and:
- Open Finder / Windows Explorer, and find a video saved on your computer.
- Drag and drop the file into the timeline.
I’ve went ahead and dropped an example video into this timeline and here’s what it looks like:
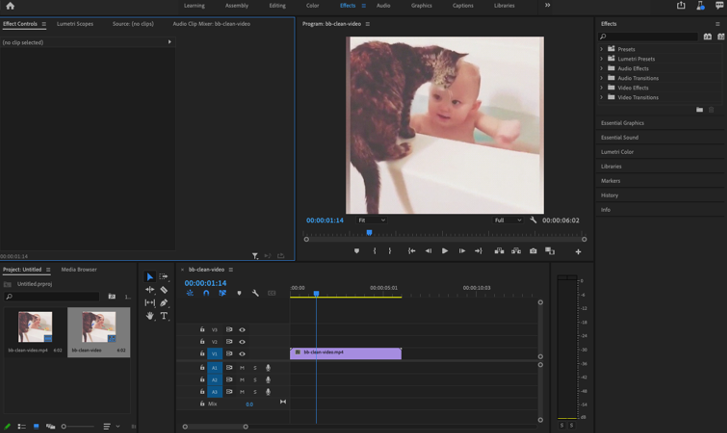
Let’s zoom into the timeline. I’ve color-coded each part of the timeline and numbered them so I can easier describe them.
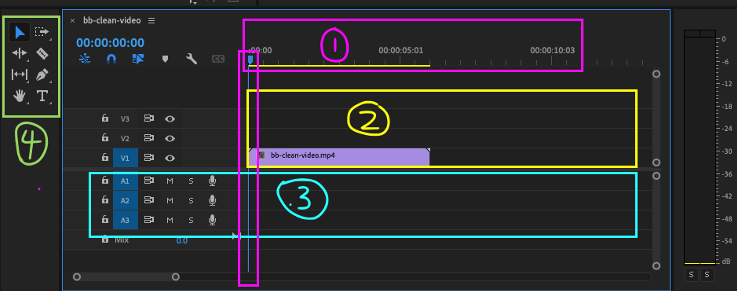
- This part shows time.
- For example, looking at the time, we can see that this “bb-clean-video.mp4” is about 6 seconds long. Each “tick” in the timeline at this zoom level represents 0.5 seconds, and it’s about 2 “ticks” longer than the marker “00:00:05:01” (a little more than 5 seconds).
- Where the cursor is (the blue vertical thing encased in the purple rectangle) is the frame that you’re looking at. As an example, in the screenshot with the baby and cat, the displayed frame is at 1 second and 14 frames in (00:00:01:14), as that’s where the cursor is pointing. The cursor is used to navigate around your movie so you can edit specific portions of the movie.
- This part shows all the video clips/pictures that you’re using in your movie. As you may know, creating a movie might require a ton of different clips. This section is where you store them.
- Since we only have 1 video – “bb-clean-video.mp4,” that’s the only clip it shows.
- Try to drag another clip into this area. And drag it parallel to where V2 is, so that the clip is directly on top of your first clip. You’ll find that if you move your cursor to where both clips overlap, V2 is shown and V1 is hidden.
- The V1,V2,V3,etc. are video layers. The higher the number, the more “in front” of the other layers it is. As an example, you might use this feature if you wanted to put a watermark or your logo “in front” of your base video. You’d have that in your V2 layer so it’s always shown.
- This part is where you store all your audio clips. For videos that come with audio, you might already see that you’ve got audio an audio clip attached with your video clip already. If you’d like to get rid of only the audio, just right click on the video clip > unlink. Now you can drag and move around the audio as you wish without affecting the video. Or simply delete the audio clip entirely without deleting the video.
- This is the tool’s section. I’ll cover some of these buttons in the next section.
Premiere Pro Buttons Mini-Tutorial
Let’s go through 3 of these buttons that I most commonly use.
The first button is the blue-highlighted mouse-looking thing here:

This is the selector tools. It helps you move clips, cursors, text-on-screen, and almost everything else around. Think of this as the mouse on your computer. It just selects things.
The hotkey for this is v. If you selected another tool, you can just press v (or sometimes if you’re deep in a functionality, press escape first and then v).
The second button is the razor icon:
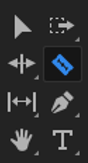
This is the crop tool. It helps you split movie clips where the cursor is so that you can delete or move portions of a clip. The hotkey of this is c.
Go ahead and try this out:
- Move your cursor to the middle of your first clip.
- Then, press c to bring the cropping tool up. Move your mouse to where the cursor and the clip meets.
- Left click, and voila. The clip is split.
- Next, press v to bring up the selector tool again.
- Left-click on the right-side of the clip and press delete.
- Bam, you’ve just deleted a portion of a clip you don’t need.
In the example video below, I run through step 1-6 above.
Keep in mind that you can crop multiple parts of a clip (i.e. just keep cropping a clip without going back to the selector tool). Every time you use the crop tool, you’re just dividing the clip up into smaller chunks so that you can modify them in whatever way you want.
The third and final button we’ll go through is the “text” icon:
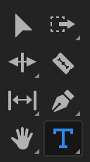
This lets you add text to the video clip.
The hotkey for this is t.
Try this:
- Press t
- Move your mouse to where the video clip is. Click anywhere
- Type something.
- Bam, you’ve added text to your clip.
Notice once you’ve added text to your clip, there’s a new video clip that shows up on your timeline pane. The “graphic” represents your text. You can crop it, or shrink or expand its duration as you need. Other words, the font you just put in just ends up as another video element. See example video below.
Shrinking And Expand Videos/Fonts
This part of the Premiere Pro tutorial shows you an easy way to crop a video clip is to just shrink it. Given that fonts you put will have some default time length associated with it, you’ll have to modify their duration.
This is easy.
- Simply press v for the selector tool.
- Put your mouse near the front or the end of the clip.
- Left click and drag to expand or shrink the clip/font.
Video example below.
Mini Premiere Pro Tutorial On How To Modify Your Font / Effects Control Pane
In the previous exercise above, you put some font on your video clip.
But how do you modify the size/shape of the font?
This is where the Effects Controls pane comes in:

This panel allows you to modify settings for anything you’ve selected on. As you can see, I’ve selected the “something” text in layer V2 (in the timeline pane). This makes it so that the Effects Control isn’t blank anymore.
I’ll quickly run through what some of these effects do:
- Text: This dropdown menu will allow you to modify the text, including its font size, color, and font.
- Position: Lets you move the object (i.e. our text) around the screen anywhere you want.
- Scale: Lets you make the object bigger or smaller. For fonts, you can change the font sizing under Text to resize as well. But consider video clips or pictures: scale would be the only option to make things bigger or smaller.
- Rotation: Lets you rotate your object.
- Opacity: Lets you set how ‘transparent’ you want your object to be.
Check out the clip below where I play around with all these different options. Feel free to press v and select the font on your screen and run through these options yourself so you can a sense of what these things do!
Remember, the best way to use this Premiere Pro tutorial is to follow along and build some basic muscle memory for using the software.
Preview Pane
The preview pane is outlined in yellow here:
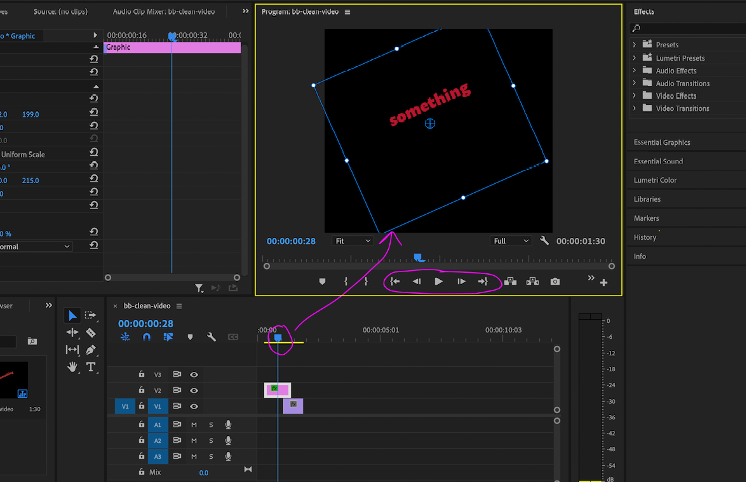
All this pane does is show you the frame where your cursor’s pointing. There’s also media playback control buttons so you can play your movie the whole way through and watch it through the preview screen. These elements are drawn in purple in the picture above.
The Project Pane
The project pane is on the bottom-left, as outlined in yellow below:
This pane just stores all your photos, videos, audio, and other media for your project, so you can easily drag and drop it into the timeline. Essentially, this pane just lets you organize your media better.
Note that anything from your computer that you directly drop into the timeline will automatically show up here as well! So if you accidentally delete a clip, you can just drag and drop it back from the project pane. Likewise, if you have a bunch of photos/videos to use in your project but don’t necessarily want to put it in your timeline, you can drag and drop files directly into the project’s pane.
In the video below, I show:
- Me “accidentally” deleting a clip on the timeline.
- Restoring the clip by dragging/dropping the clip back onto the timeline.
- Dragging/dropping another video onto the project pane, and it won’t show up on the timeline.
- Dragging/dropping the new video onto the timeline directly.
The Effects Pane
This pane is outlined in yellow below:
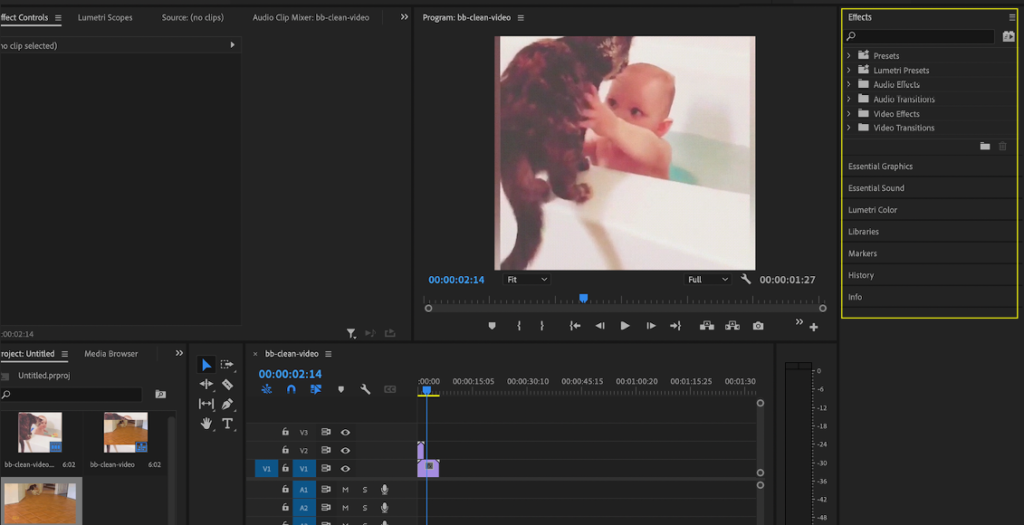
This pane allows you select from a library of effects so you can modify your video/audio clips in your timeline in a bunch of cool ways. Some cool effects include:
- Monochrome (to make clips black and white)
- Filter and EQ for audio
- Tons of video transitions
- And a ton more. Feel free to expand the folders to explore all the insane options that Premiere Pro gives you.
Most of these effects work by:
- Dragging and dropping the effect onto the video/audio clip in the timeline.
- Selecting the video/audio clip.
- Adjusting the settings in the Effects Control Pane for this effect.
While this is quite cool – I feel this pane isn’t super relevant for beginners. I think beginners in using the software should focus on:
- Knowing how to put audio/video clips in the timeline
- Knowing how to split clips up with the razor / crop tool.
- Knowing how to put font up onto video clips.
- And knowing how to modify text/video clips’ configurations via the Effect Controls pane.
Quick Review Of The 3 Most Common Hotkey I Use
- Select stuff: hotkey v
- Razor tool/split up clips: hotkey c
- Add text onto clips: hotkey t
Wrapping Up This Beginner’s Premiere Pro Tutorial
You can read a tutorial, but the most important thing to do as with learning any skill is practice, practice, practice.
And the best practice you can get is actually doing the actions that’s been outlined in the mini-demos put together in this tutorial.
Once you’ve practiced enough, you should be able to easily answer the following questions:
- What do the panes/little windows do in Premiere Pro?
- What are the most useful/common buttons to press and what are their hotkeys?
If you don’t have Premiere Pro yet, here’s an affiliate link for you to download it if you’ve found this tutorial helpful!
P.S: Downloading from the affiliate link gives me a cut, but won’t cost you a penny more. It will help me greatly in keeping my site running. Please let me know if you’ve any questions on Premiere Pro usage or anything else at hello@goodmoneygoodlife.com


0 Comments
Trackbacks/Pingbacks