

In this post, you’ll learn 3 methods to easily remove a photo’s background in Photoshop. Removing backgrounds in Photoshop is of utmost importance because every single successful Shopify store has 2 types of images:
- Product images
- Lifestyle images
As such, there’s going to be a lot of images you’ll need to remove a background for in Photoshop, and you’ll need to do it…a LOT.
So I’ll show you a few methods of doing it: from the easiest and fastest ways to the slowest / hardest ways. I advise you start with the fastest ways, and if that method doesn’t work move onto the next hardest method.
Table Of Contents
3 Ways Of Removing A Background From Photoshop
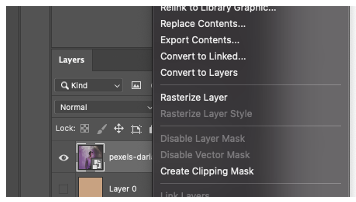
For all the steps below, you’ll first need to make sure to rasterize the layer so you can edit the photo.
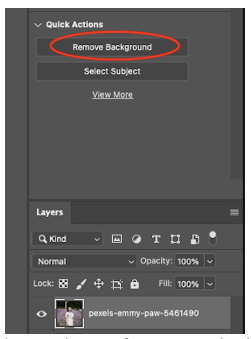
First And Easiest Way (1 Second Method)
Simply just click on the layer you want, and under the properties tab click on “remove background” and Photoshop will automatically remove the background for you. Anti-climatic much?
Here’s the before-and-after of doing it this way for an example photo.
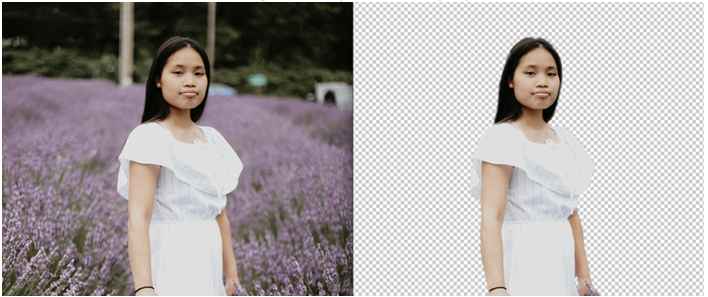
It isn’t perfect and the edges are kind of blurred, but for a 1-second technique, this is pretty good.
Caveat: your mileage will vary depending on the coloration of the subject and background, and how complex your photo is.
If for your application, this one-click solution isn’t good enough, try it the next way.
Harder Way (Takes A Minute Or Two)
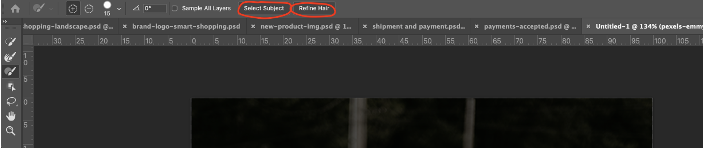
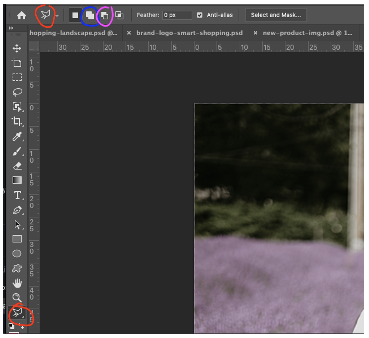
1 – Press “w” for the wand tool. Near the top, press “select and mask”
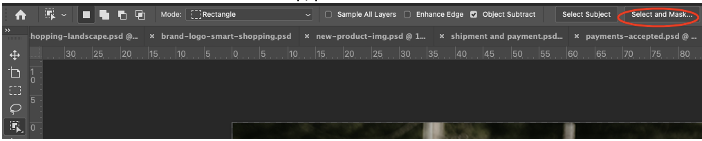
2 – A new window will show up. Press “Select Subject,” and if your subject has hair, press “Refine Hair” afterwards as well. In our case, her hair isn’t really that complex (smooth curves), so we’ll bypass this step.
3 – Then, play around with the options on the right to get the best results. For us, the circled options got the best results. Here’s what each of the items mean:
Color: We made this yellow so it’s easy for us to see what the Photoshop AI has chosen. We made opacity = 100% because Photoshop can be very aggressive in fading out opacity and 100% makes this much easier to see.
Object Aware: This is better for more complex objects with complicated edges. Color aware does edge detection based on color, and object aware does edge detection based on what Photoshop thinks the object’s outline is.
Radius: Granularity at which Photoshop will refine edges. Use a bigger value if the edges are more smooth, and a smaller value if it’s smaller. You can use smart radius if your object has a bunch of sharp edges in conjunction with a bunch of smooth edges.
Smooth: The higher the value, the smoother the edges are and the more cleanly it fades into the background. The lower the value, the more “sharp” the edges are and the colors will suddenly drop off at the edge.
Decontaminate colors: This cleans up colors on the subject. For example, if there’s some weird lighting on our subject’s head, Photoshop will try to get rid of that lighting and re-color the subject’s head as if the background lighting has no influence over our subject. We find when we activate this, our subject has a lot of transparent holes through her, so we didn’t tick this.
Output to new layer with layer mask: we want to output to a new layer so we don’t destroy our current layer and can make changes to the original photo if things go wrong.
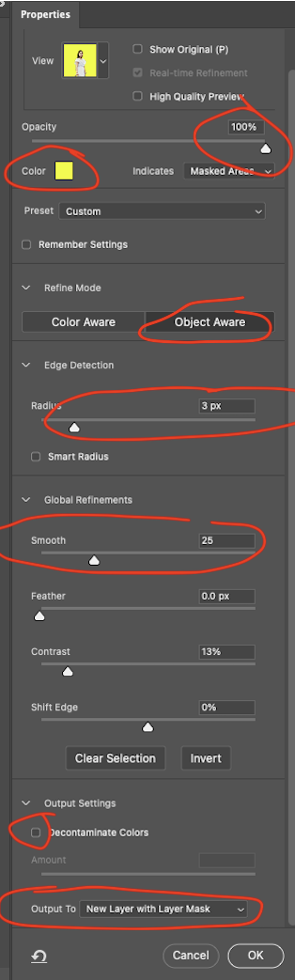
4 – Press OK.
Here’s the results:
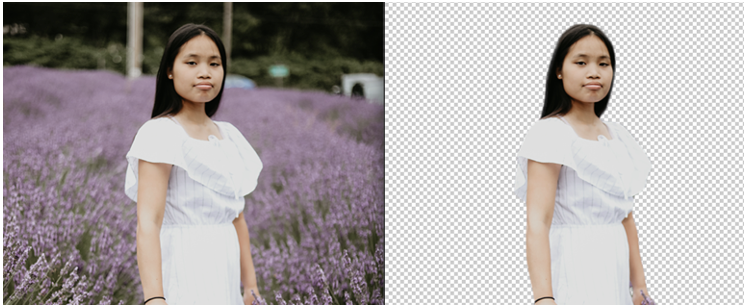
This isn’t as easy of a way to remove your photo’s background but it still utilizes the Photoshop AI to a heavy extent so you don’t have to manually remove the background.
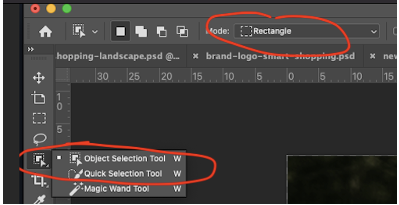
Hardest Way (Could Take A Second, Or An Hour)
In this method, we’ll just use the magic wand tool. We recommend using the object selection tool, with rectangle as a first try.
Then, simply left-click and drag the rectangle to encapsulate your subject. You’ll then get marching ants like this:

At this point, you have a couple of options:
- Be happy with the selection and do ctrl+J (or cmd+J) to duplicate the selection into a new layer, OR
- Expand/shrink your selection.
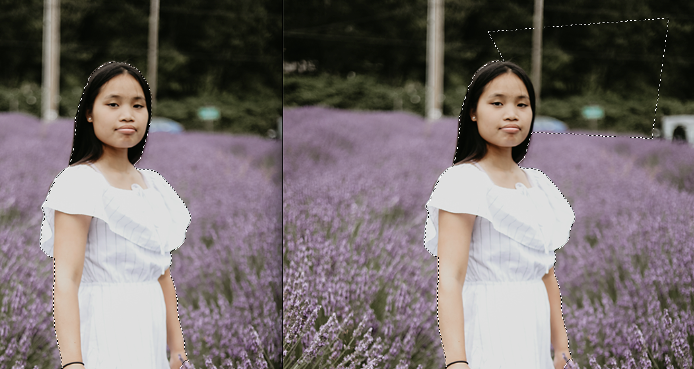
If you want to go with option 2, then simply tap the L key for the lasso tool, and do shift+L to rotate your lasso tool until you get the polygonal lasso tool. It looks like this:
In red is the tool you’ll want to use to do refinements. Click on the “blue” button if you think the selection isn’t sufficient and you want to add onto your selection. For example, I can add an arbitrary area next to her head if I want. Below is before and after I used the “add to selection” (blue) button with the polygonal tool. I made the selection huge for purposes of illustration but in reality you’d zoom in and add details with the tool.
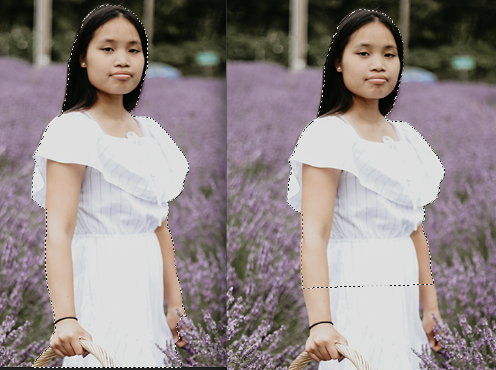
Conversely, if you wanted to say, get rid of the bottom of her torso because the intersection of her hands and the field of flowers is too much to handle, you can press the “subtract from selection” (circled in purple) button and do something like the below instead. Left is before subtraction, right is after subtraction.
At this point, if you’re going to do refinements, it is fairly important that you err on the side of selection too much vs. too few. This is because once you do ctrl+J / cmd+J on your selection onto a new layer with a transparent background, you’ll always have the option to use the eraser tool to get rid of tiny imperfections of your choosing too much. But if you chose too little of the subject and duplicated her, you need to ctrl+Z / cmd+Z and undo your way back and refine your edges again.
Sometimes, You Can’t Easily Remove Your Background In Photoshop (But Most Of The Time You Can)
The whole point of removing backgrounds is so you can put the photo on your website so you can start selling stuff.
As such, we want to optimize for speed and not waste hours editing a photo if it isn’t necessary to do so. And especially for product photos, the edges are a lot easier for Photoshop to handle, so I’d venture to guess that only 1 in 50 photos require any kind of extensive work / more complicated methods I mentioned above.
The whole point of removing the background is not to pursue perfectionism, but to create a photo that is professional and impressive to the customer. If you have something that’s off by one pixel, leave it. Making the selection pixel perfect will waste you many hours, and the results will be 100% imperceptible by anyone looking at the website.
And in your e-commerce career, you might remove backgrounds for hundreds, or thousands of photos, so speed is your friend. Thus, you should attack your photos in this order:
- Just press “remove background,” and if that doesn’t work.
- Use more customization with the “select and mask” method inside the wand tool. And if none of the settings yield the results you want and you have to do it manually, then and only then…
- Create an initial selection with the wand tool and start doing refinements with the lasso tool. When you’re satisfied, duplicate the selection into a new layer so you won’t destroy the original layer and can always ctrl+Z / cmd+Z your way back to when you were working on your selections.
One last note: keep in mind the vast majority of your visitors will be on mobile. This means that if you’re doing Photoshop on desktop, a glaring imperfection in your selection might not even be observable on a mobile device. If a photo is taking you a long time and you’re obsessing over some detail, zoom out and see if you can still easily see the defect. If the answer is “no, you can’t easily see the defect when zoomed out” then just work on the next detail.
The longer you work on your image details without increasing its impressive value, the more time and money you lose.
P.S.: This is a new blog and if you’ve found this helpful at all, it would mean the world to me if you were to share this post to someone that you think this post might benefit. It would also be immensely helpful to me if you could give me any feedback on the content at hello@goodmoneygoodlife.com


0 Comments
Trackbacks/Pingbacks