

In the previous Adobe Cloud post, I talked about how you can use adjustment layers in Premiere Pro to affect all the clips below it. Here’s a refresher of what the effect of an adjustment layer looks like:
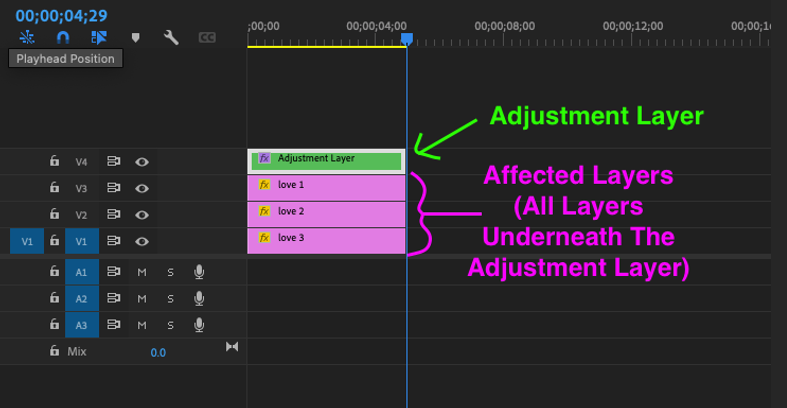
The pink layers/clips are below the green adjustment layer. Hence, they’re affected. If they were above it, they wouldn’t be affected. Example: If you swapped “love 1” layer with “adjustment layer”, then only “love 2” and “love 3” clips would be affected.
Refer to our super clear / concise tutorial on what they are, why they’re used, and step-by-step on how to use it if you’re unfamiliar with adjustment layers in Premiere Pro.
NOTE: Though this is a Premiere Pro post, adjustment layers work pretty much the same in Photoshop. Adobe’s software is great in that they’ve got a lot of concepts that cross each other in the entire suite. This way, you don’t have to pick up drastically new concepts when going from Photoshop to Premiere Pro to Illustrator, or vice versa.
Anyway, adjustment layers are great and all – but there’s a problem here…
Table Of Contents
The Problem With Adjustment Layers
The problem with Premiere Pro’s adjustment layers is that they natively affect all layers below it. This is bad, because what if you want to do the following:
- Have one adjustment layer affect 2 layers below it.
- Have another adjustment layer affect another 2 layers.
You might be tempted to do organize your layers like this:
You want:
- “love 1” and “love 2” layers to have the same behavior.
- And “love 3” and “love 4” to have the same behavior.
- You want love1/2 and love3/4 clips to behave completely separately to each other.
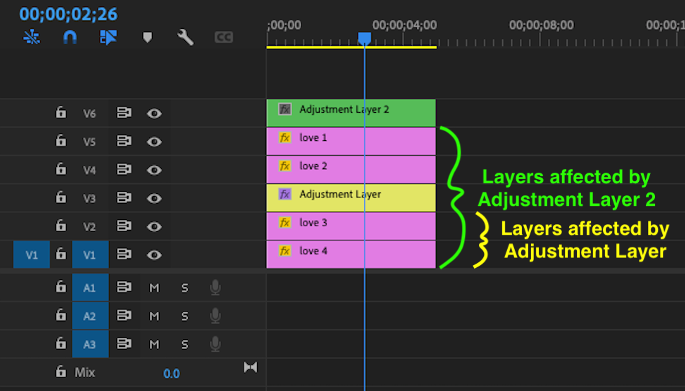
What you actually get with the setup above:
- “love 1” and “love 2” layers are affected by ‘adjustment layer 2’ on clip V6.
- “love 3” and “love 4” layers are affected by ‘adjustment layer’ on clip V3…and also are affected by ‘adjustment layer 2’ on clip V6.
So love3/4 clips have will have extra that affects you don’t want. Namely, you want to avoid adjustment layer 2 (mean for layers love1/2 only) from affecting layers love3/4.
You can try to reorganize the layers but you’ll find that if you have tons of adjustment layers / tons of clips, it’s impossible to actually solve this constrained problem.
Ergo, the problem is: how do we get Adjustment Layer 2 (green) to affect only a subset of layers below it, as opposed to all layers below it?
Quick Demo Of The Problem
Let’s say the yellow adjustment layer moves things vertically. And the green adjustment layer moves things horizontally. Thus, we want layers love3/4 to move horizontally while love1/2 to move vertically.
You’ll notice the love3/4 layers are moving diagonally. This is because both the horizontal and vertical moving adjustment layers are acting on it.
On the other hand, love1/2 layers move horizontally, as expected, because they’re above the yellow adjustment layer.
How To Get Your Adjustment Layer To Only Affect One (Or Some) Layers
The explanation of the problem is perhaps more complicated than the actual solution. To solve this, simply do the following:
Step 1: First, select the layers you want to behave as a group, individually.
Step 2: Then, right click -> Nest.
Step 3: Rename the nested clips to whatever you want.
Step 4: Finally, repeat steps 1-3 for all the groupings you want to behave differently.
Here’s a quick clip of steps 1-4 (i.e. steps 1-3 done to the ‘horizontal’ and ‘vertical’ group):
Due to some lack of understanding on my part, or a bug on Premiere Pro’s part, you’ll notice in 00:18, it doesn’t work yet. I have to double-click inside one of the nested groups (0:21), and then come out of it (0:22) before it behaves as expected. I’ve no idea why.
Results: You’ll see that the love3/love4 now moves only vertically as expected. And love1/2 moves horizontally as expected. You could in theory just nest the horizontal group and it’ll work. But I wanted to nest the vertical group as well for 2 reasons:
- It’s more pedagogical since you may have a lot more than 2 groups of differing effects.
- It’s more organized to keep things symmetric in your projects.
Intuition behind Premiere Pro’s nested sequence: when you nest layers together, you encapsulate them from the rest of the project. This is both for organizational and functional reasons:
- If you’ve got a bunch of clips that are cluttering your workspace, it’s easier to modularize it into its own little ‘nest’ so you can focus working on that specific part of the project.
- It silos certain parts of the project from others, making it so that effects and other things won’t interfere with things inside the ‘nest’.
Hence, a nested sequence is in its own little sandbox and won’t be affected by other effects in Premiere Pro.
In Sum: Nested Sequences In Premiere Pro
You use nested sequences in Premiere Pro to be able to:
- Organize and encapsulate complicated parts of your project into smaller, simpler parts.
- Isolate parts of your project from other parts of the project.
Since nested sequences can accomplish the above 2 objectives, it’s an easy solution / great pairing to use with adjustment layers, where you don’t necessarily want to affect all layers underneath the adjustment layer.


0 Comments