Learn the quick & easy way on how to merge layers in Photoshop in this blog post.
A lot of Photoshop creations require tons of layers. As examples, you can generate a lot of layers when you:
- Are trying to interleave different objects on top of / behind one another.
- Have multiple objects from different images you’re trying to shove together.
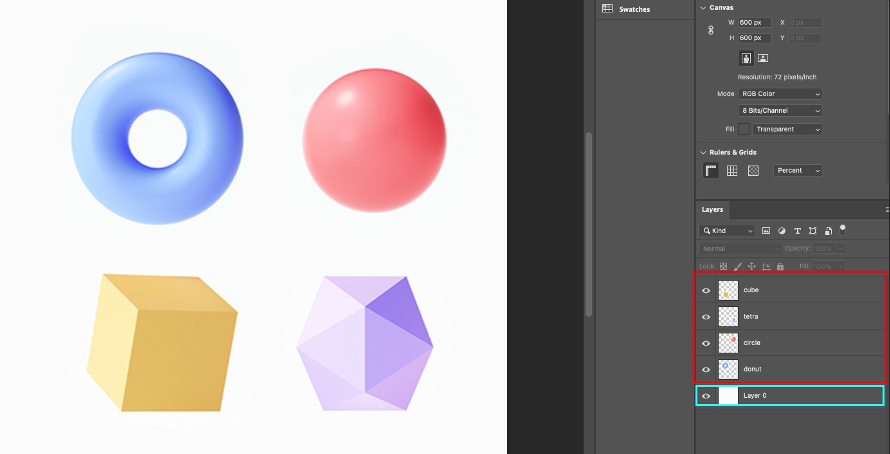
Many of my Photoshop projects I do for my e-commerce business ends up with tons of layers. And I typically end up with a layer stack that looks something like this:

It’s a mess.
A lot of times, you don’t even need to keep this many layers once you’re done with whatever you were doing. Sometimes, you might just want to merge layers in Photoshop so your layers are much better organized and it’s a lot cleaner to edit your .psd going forward.
Read below to see how to do that.
How To Merge Layers In Photoshop (Without Losing Your Originals)
In the following example, I have:
- 4 shapes dispersed in 4 different layers (cube, tetra, circle, and donut layers). Highlighted in red rectangle.
- Then, I’ve got a white background layer so the 4 shapes are unified with a single background color (layer 0 – highlighted in teal rectangle).

Suppose I wanted to do a lot more things with this .psd. How do I go about merging these 5 layers into 1 so I can continue working on this .psd without having hundreds of unmanageable layers?
Simple. In order to merge these layers in Photoshop, without losing your originals:
Step 1: First, cmd/ctrl click the layers you’d like to merge.
Step 2 (optional): If you’d like to backup your originals, you can do this step. Hit cmd/ctrl+j to copy the layers, and then hit cmd/ctrl+g to create a new group for these layers. Name it whatever you want, and then hide it. In my case, I put my backup layers into a group called ‘backup’ and hid it.
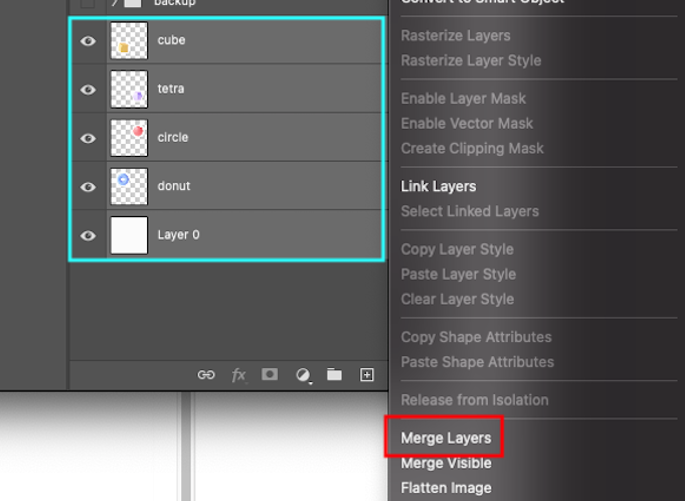
Step 3: Then, select all of your layers again (in my case, it’s just the 5 layers: cube, tetra, circle, donut, and layer 0). Selection’s outlined in a teal rectangle below. Then, right click -> merge layers (red rectangle below). Be sure not to do flatten image. Flatten image won’t preserve customized transparencies you’ve set for your objects.

And you’re done!
You Did It!
You’ve successfully merged layers in Photoshop so you can continue working on your project with better organization.
If you did the optional step 2, you should also now have backups for your original layers. If you mess up down the line, you can always refer back to the backups to fix any issues.
Alternatively, you could just skip step 2 if it’s a small enough project where you feel confident you can just “undo” your way out of any mistakes.


0 Comments
Trackbacks/Pingbacks