

This Shopify tutorial for beginners will talk about what Shopify “is” exactly, and how to set it up so you can start your journey in e-commerce.
Table Of Contents
What is Shopify, Anyway?
Since this Shopify tutorial is aimed towards beginners, I’ll assume you don’t know what Shopify even is.
Is Shopify a website? Is it like Wix where you can build stuff? What “is” it?
Simply put, Shopify is a web app you can use that’ll allow you to easily build a website, collect payments, and do everything e-commerce related in a smooth and easy fashion.
With Shopify, you can easily launch a new website and start selling things within an hour.
There are other builders out there that’ll allow you to sell stuff online, but they are more difficult to use. I’ve used things like ClickFunnels, and it’s a functional product as well. However, with ClickFunnels, every single little integration is an enormous pain to do, and it’s a lot more expensive starting at $97/mo (vs. Shopify which starts at $29/mo as of this writing).
What’s an “integration”? An integration is just a piece of tech that’s a part of your website. Couple of examples:
- Email signup forms. Clickfunnels needs you to connect it with Mailchimp or AWeber, or something complicated. Shopify has a plethora of apps that allow you to set up an email list fast.
- Payment collection. Clickfunnels needs you to sign up for a Stripe account and enter API keys just to collect payment. Shopify has Shop Pay, where you just enter your ACH information and you’re good to collect money from sales.
- Custom domain: Clickfunnels will have you do a bunch of steps and it’s generally a nightmare to get it working and pointing to the Clickfunnels servers. With Shopify, you can just do it inside the Shopify dashboard which I’ll show you in a second.
Shopify makes a lot of these tiny bits and pieces of websites come together much easier, and while Clickfunnels could do the same thing, it’ll take much longer to execute and is a lot more expensive.
Also, Shopify is designed for e-commerce (i.e. a real business) whereas I feel like Clickfunnels is just designed to sell guru courses (i.e. a business where you promote a low-value digital course and promise unreal results to get people to pay you).
In other words, Shopify beats Clickfunnels and basically a lot of other platforms I’ve used out there in terms of both simplicity and pricing.
Tutorial On How To Set Up Shopify For Beginners
Below, I’ll outline all the steps you’ll need to start your website and start selling stuff.
Signing Up For Shopify and Having A Website In Minutes
First, you’ll want to sign up for Shopify here.
Second Step: Once you enter your email and start your free trial, you’ll be asked to enter your details. Once you enter your details, your store will be created for you. It’ll look something like this:
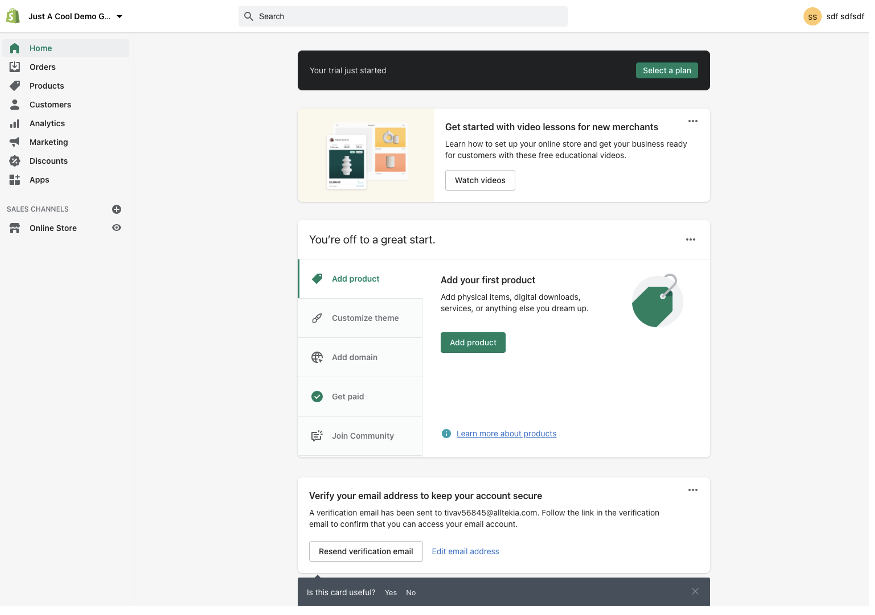
With only a minute of effort, I was able to create a demo store:
Getting A Custom Domain For Your Shopify Website
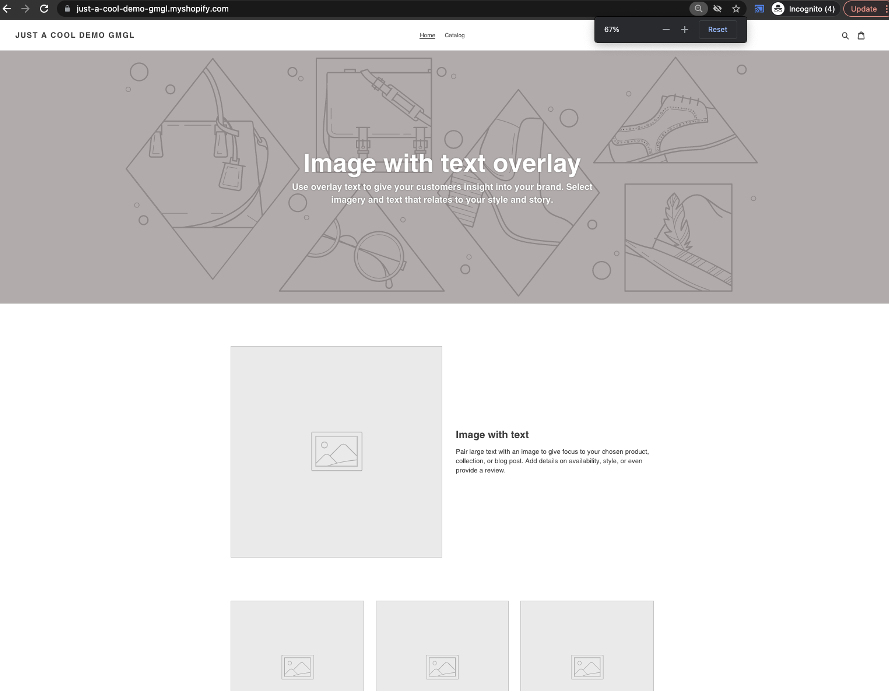
You’ll notice that the demo site I’ve made has a URL of: https://just-a-cool-demo-gmgl.myshopify.com/.
Since you want to be able to have your own domain so you build some brand authority, I’ll show you a beginner-friendly way of doing that in this Shopify tutorial.
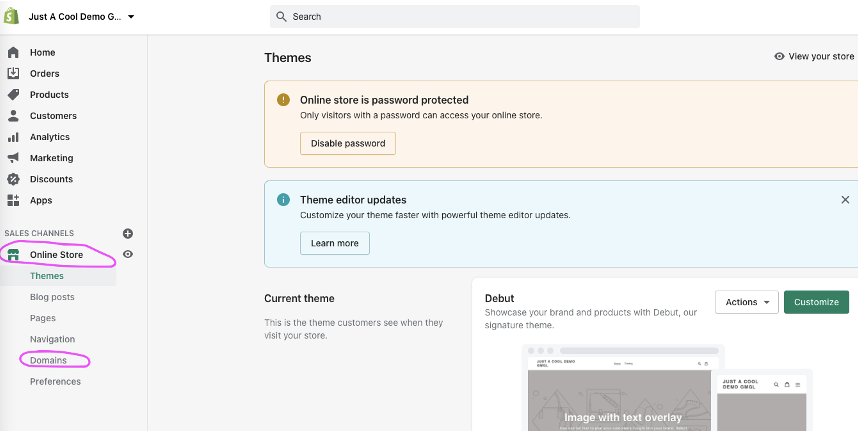
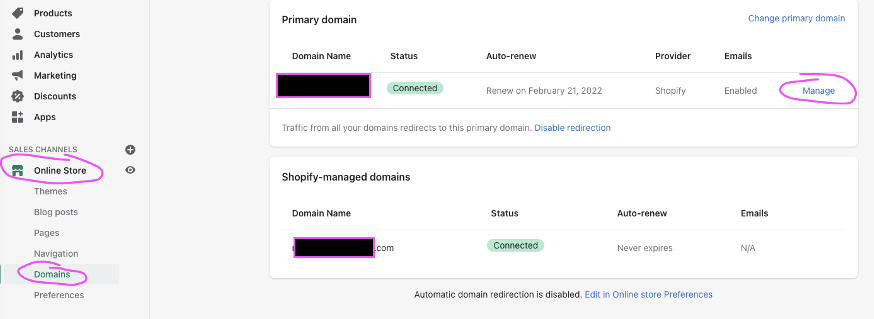
In your dashboard on the left hand side, click “Online Store” – this will expand a menu. Then click “Domains”:
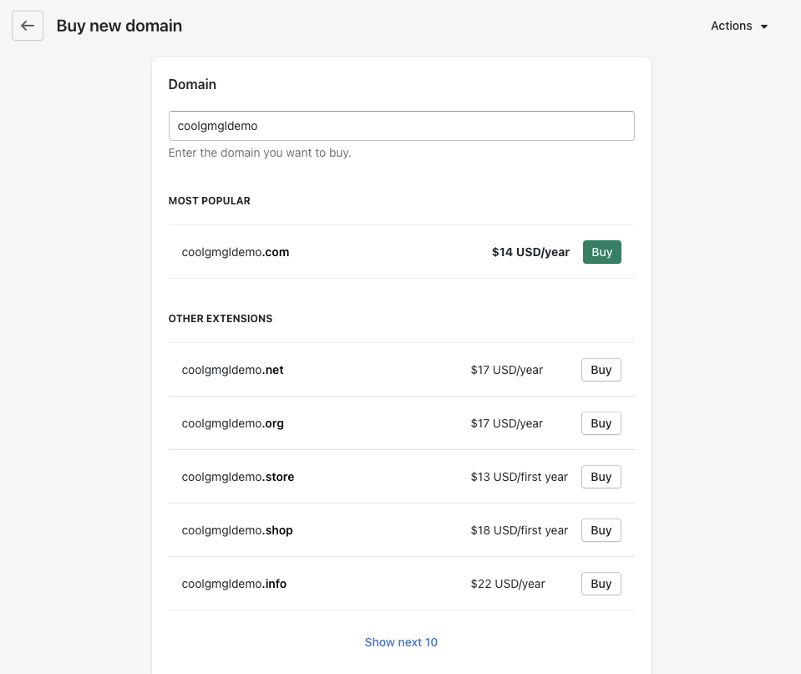
Click “Buy New Domain” on the top right.
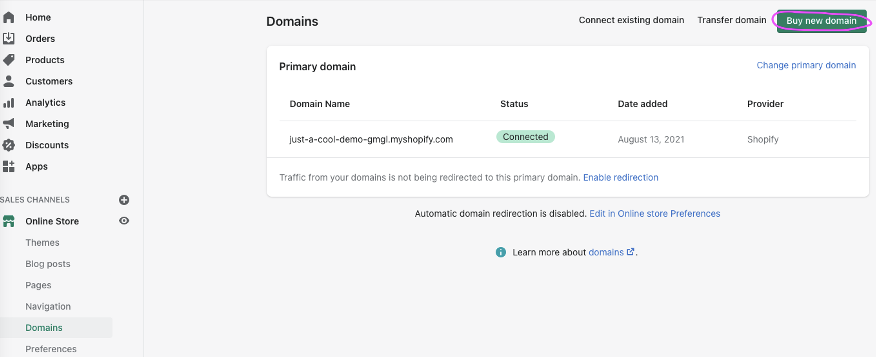
This’ll bring up this page that’ll let you search whether or not some domain is available.
For example, in the below, “coolgmgldemo” is available to buy. For the purposes of this tutorial, I won’t buy it since I already have enough domains to keep track of. But once you find the domain you want, just press “Buy”:
Once you purchase your domain, Shopify will automatically update the domain so that instead of “https://just-a-cool-demo-gmgl.myshopify.com/” it’ll be “coolgmgldemo.com”.
Congrats, you’ve created a bonified website with a custom domain name within minutes!
Setting Up Your Email
Since this is a Shopify tutorial for beginners, you’ll need to be able to have an email for customers to contact you. Likewise, you’ll want to be able to contact your customers.
There’s a few ways to go with this:
- Just regular Gmail (if you’re OK with your email ending with @gmail.com instead of @yourdomainname.com)
- Gsuite (now rebranded as Google Workspace)
- Zoho
- Private Email by namecheap (my favorite)
Regular Gmail: This is straightforward, as you can just sign up for a Gmail account.
Gsuite and Zoho: These are nice and simple to setup with Shopify since under Domains > “Manage” > “Use third-party hosting service”, you can find the following:
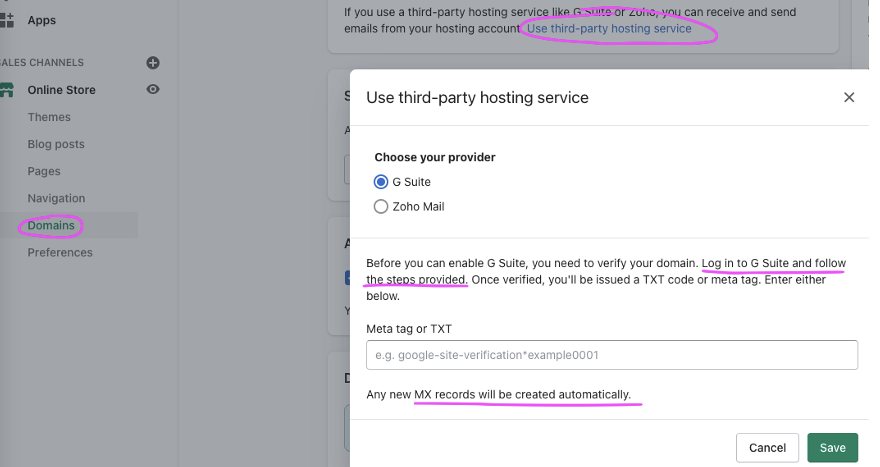
All this to say, when you use non-Zoho or non-Gsuite, you’ll need to update your MX records manually. If you do use Gsuite or Zoho, they’ll tell you exactly which buttons to press nad how to verify your domain. Here’s Gsuite’s example – instead of having to do the entire tutorial, all you need to complete is Step 1, where you copy the TXT record and paste it in the field in the screenshot above.
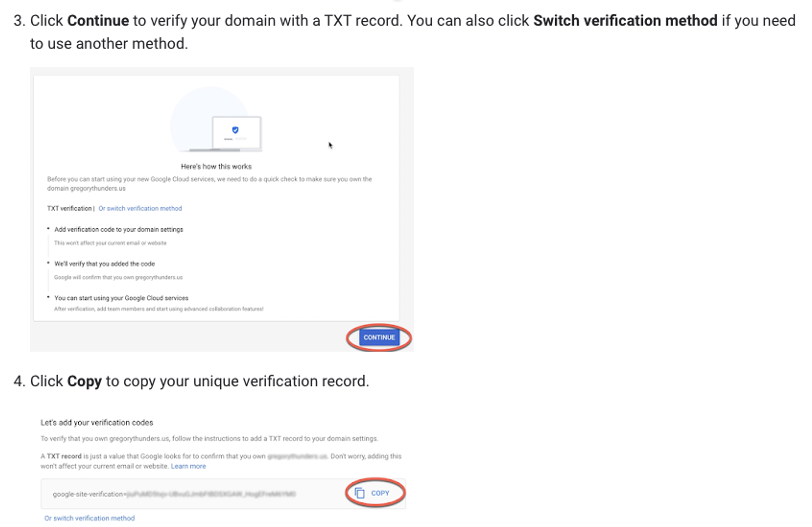
Once you copy/paste the TXT record in the field, Shopify will take care of Steps 2 and 3 for you, and all you’ll need to do is wait a little bit for the DNS records to propagate and click “Verify.”
Thus, Zoho and Gsuite are a huge convenience!
The main downside with Zoho and Gsuite is they require real mobile phone numbers to verify a new email address. You can’t use a virtual phone number to get a new Zoho and Gsuite email account. This is bad because if you wanted to run multiple brands, it makes new email accounts very inconvenient.
Even though Zoho is free compared to Gsuite’s $6/mo, I prefer Gsuite if I had to choose between the two, because Zoho’s sign-up process is pretty iffy. Sometimes it’ll be easy, but sometimes their system hangs and you can’t sign up for an email.
Namecheap / Privateemail.
Using namecheap’s privateemail is my favorite method, because it’s easy to set up and it’s quite cheap (compare its $0.84/mo as vs. $6/mo for Gsuite as of this writing).
Once you sign up for the account, all you need to do is connect your Shopify’s DNS settings to Namecheap’s servers so privateemail can receive and send email for your Shopify store.
More specifically, you want to:
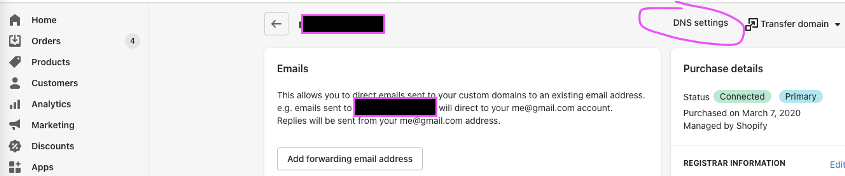
First, from your dashboard, press “Online Store” to expand the menu. Then do: Domain > Manage.
Then press DNS settings on the top right:
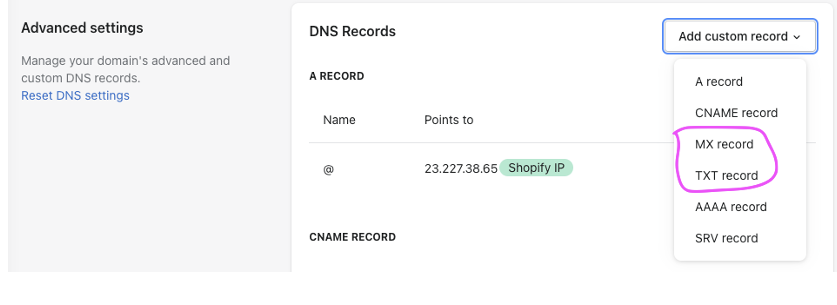
On the top-right, click on the Add custom record dropdown to add MX, TXT records described in these instructions, and voila, you’re done!
2 quick things to double-check everything’s working:
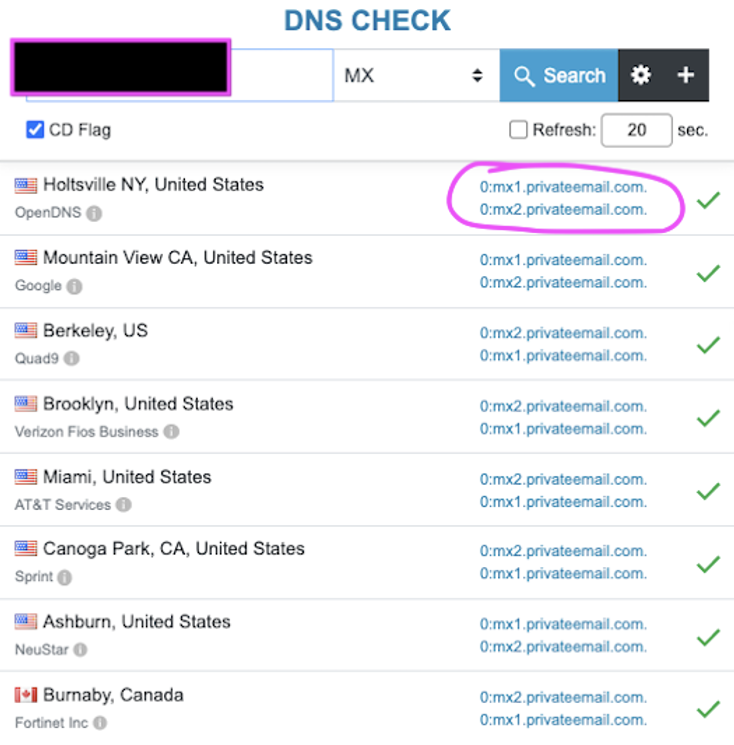
- You’ll want to go to this website to check that your MX, TXT records have propagated/updated. It may be pretty quick, or it might take a while. What you’re looking for is that your new MX/TXT records are showing up. For example, checking that an MX is updated will look like this for privateemail (I set my priority to 0 instead of 10 and removed the original Shopify MX, but you don’t have to do this).
- Once you’ve confirmed your DNS settings have propagated, go ahead and send an email to your new business email account to make sure you can receive the email. Conversely, use your new business email to send an outbound email to a personal email to make sure that outgoing emails work.
Privateemail from Namecheap is my fave because while it take a couple more steps to set up, its verification process is much easier and it’s a lot cheaper than Gsuite. The GUI isn’t bad either.
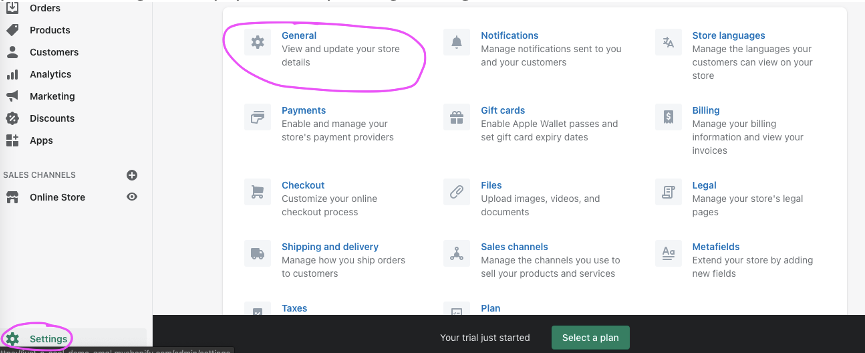
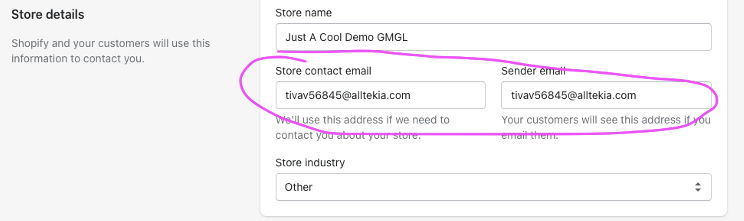
Regardless of the method you choose for your business email address, you’ll need to update your email settings on Shopify. Do this by clicking “Settings” then click on General.
Then just update your email with your new business email here:
The Namecheap method might not feel like a Shopify tutorial made for beginners since it does have a few extra steps, so if this is your first store, you can go ahead and do Gsuite/Zoho. Namecheap is just a great method for when you’re starting your second or third store.
Your Business Phone Number
In this tutorial, we’ll avoid a mistake that beginners make for their Shopify stores. This mistake is having your personal phone number listed on your store.
You don’t want this, because you eventually want to separate your personal life and contacts with your business / customer contacts.
I’ve tried a ton of different phone services, from Line2 to Skype Numbers. You can use any, but my favorite one is openphone.co – I’m not even sponsored if you sign up for OpenPhone, it’s just actually a great product with an easy GUI. It’s not the cheapest, but it is one of the easiest to manage.
Shopify Apps
One of the most powerful things about Shopify is their apps ecosystem.
Shopify Apps allow you to expand the functionality of your website. Some examples:
- Some apps like Gempages/Debutify allow you to customize the look and feel for your website even more than what Shopify offers natively.
- DSers allow you to dropship and automate customer orders with a click of a button.
- ETA injects a webpage on your website to allow customers to have a “self-serve” page to track their own orders, so they won’t have to email you for where their order is.
- Post purchase survey injects a survey on the thank you page so you can know what exactly paying customers think of your product.
- …and a lot more.
I dive deep into 12 Shopify apps that I use to run a 6-figure Shopify store here.
Apps are optional to install, but highly recommended for higher conversion rates.
Tutorial For Setting Up Your Shopify Look And Feel For Beginners
I’ll just do a quick whirlwind tour of how to customize the look and feel of your website as this is beginner-oriented Shopify tutorial.
Click Online Store > Themes and at the bottom is a “Theme Library” where you can explore free or paid themes.
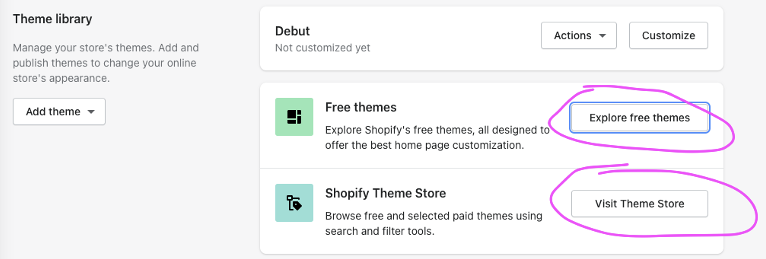
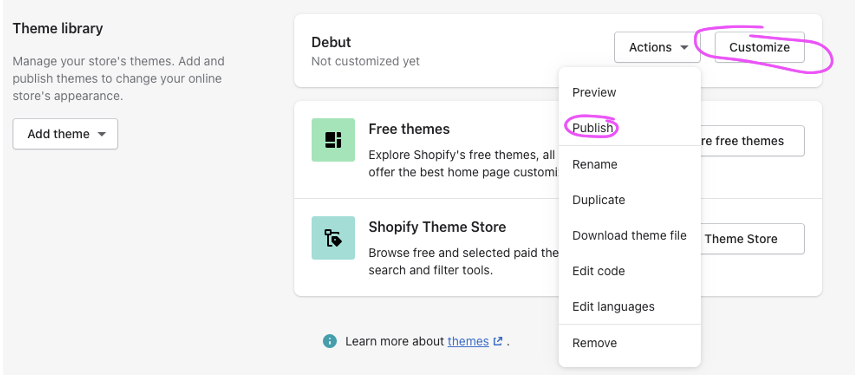
A theme is just a pre-set of the look and feel of your Shopify store. Feel free to just pick and install what works for you. Once you’ve installed your new theme, it should show up on your Theme Library. Just click on the Actions dropdown and click “Publish” to have it go live. Alternatively, click Customize to customize your theme.
If you press Customize, you’ll see a screen that’s like this.
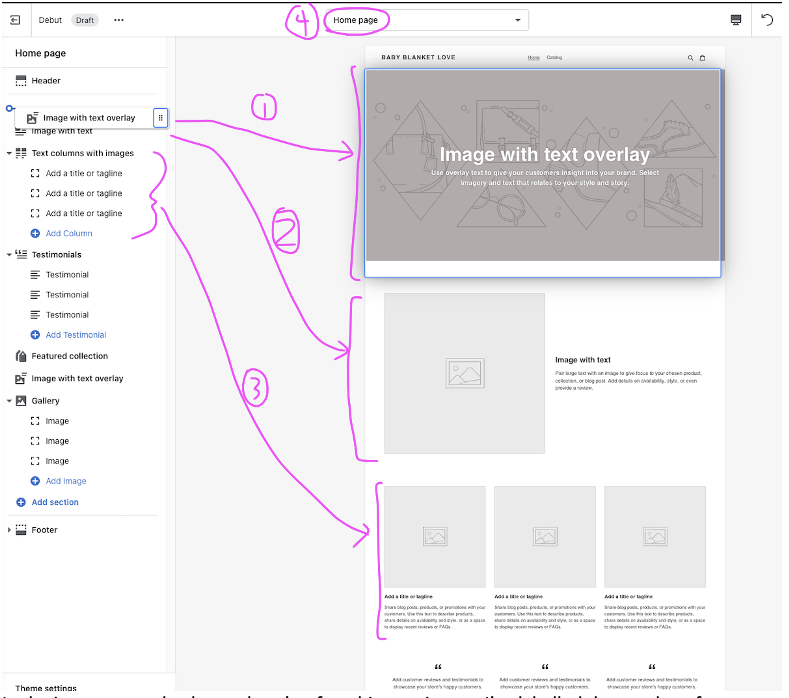
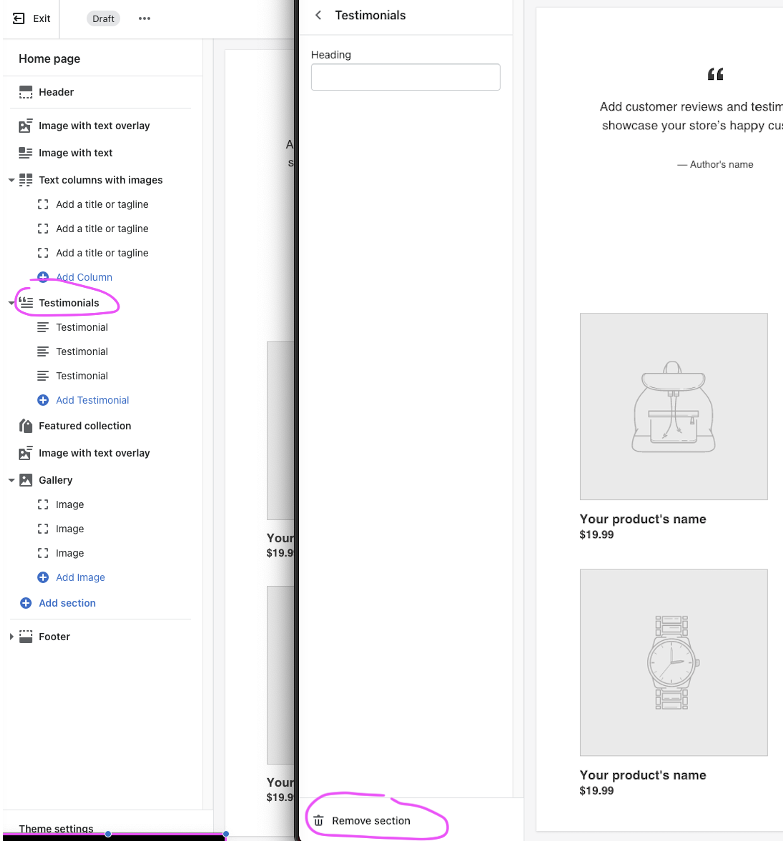
In the image example above, there’s a few things going on. I’ve labelled the numbers for your convenience.
- The “Image with text overlay” is the first section of the homepage. But you can easily re-arrange each section by dragging and dropping the sections on the left-hand side, which is why this section is outlined in blue.
- “Text columns with images” is the second section of the page.
- “Text columns with images” is the third section of the page.
- We’re currently editing the homepage, but you can easily customize the look and feel of your product pages/collections pages as well. The default product pages/collections is actually quite good in my opinion already, so we’ll skip it in this Shopify tutorial for beginners.
But let’s dig a bit deeper. Let’s say I don’t like a section. I can easily delete a section. Let’s say I wanted to delete the “Testimonials” section, I just click Testimonials and then Remove Block.
Now, say I want to add pictures or text, or customize a section. Let’s say I wanted to adjust the “Text columns with images” section and I wanted to change the text/photos:
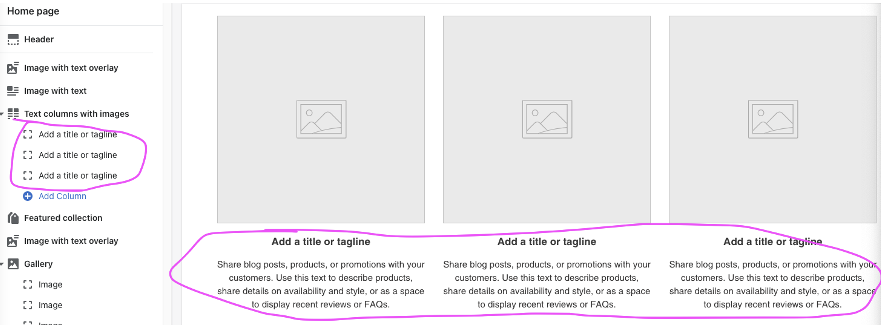
Simply click on Add a title or tagline on the left-hand side and a menu will show up that’ll let you customize the text and image of the section. As an example:
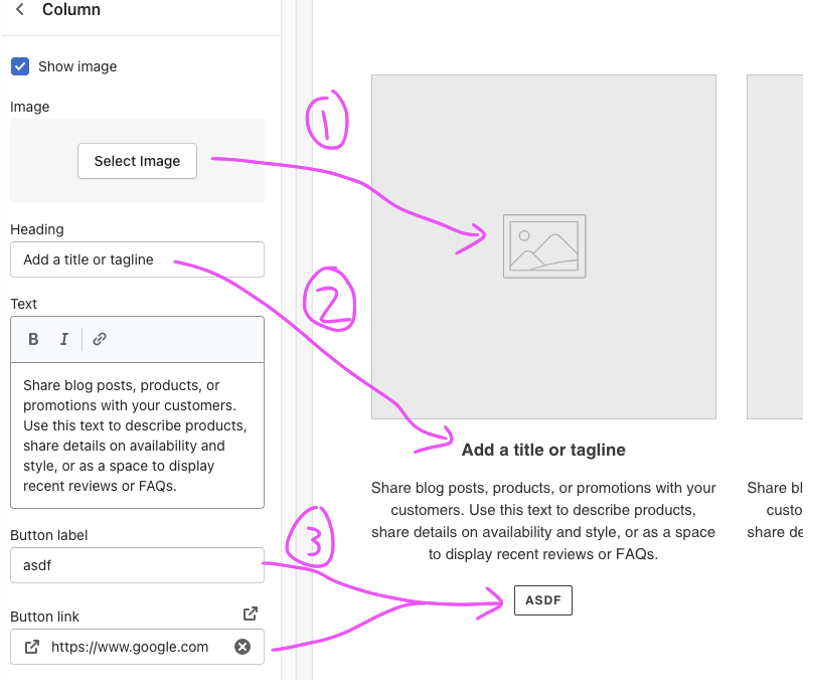
- The “Select Image” lets you upload an image that’ll replace the placeholder image.
- The heading and text sections allow you to change the corresponding placeholder heading/text.
- The “button label” and “button link” allow you to add a button to the bottom of the paragraphs, and link it to something (i.e. a product).
Keep in mind that these menus will be different depending what kind of item it is. For example, the menu for an “Add a title or tagline” will be different than the menu for “Image with text overlay” but will be somewhat similar to “Image with text.”
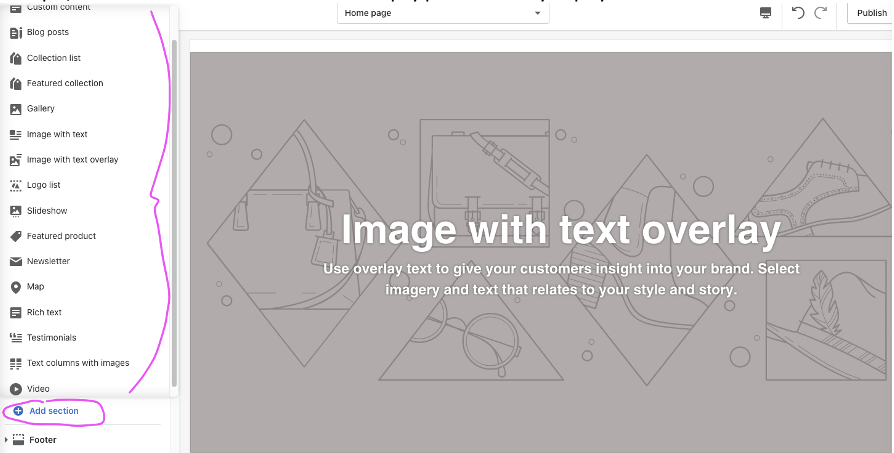
Since Shopify has a ton of different sections for you to play with and customize, I won’t go into each of them here. Feel free to experiment with each as it’s the best way to learn. As an example, here are some of the sections that Shopify provide to let you play with:
If the above isn’t enough, just keep in mind there’s tons of apps that’ll allow you to do even more with your website’s look and feel if you’d like. Some examples are:
- Gempages – a drag and drop builder. But they’re suspended from the Shopify App store until November of 2021.
- PageFly – Another drag/drop builder.
- Shogun – Another drag/drop builder.
- Debutify – A theme that’s similar to the default Debut theme. But more flexible.
- EcomSolid – A theme that’s sort of a hybrid between Gempages and Shopify’s default theme editor.
Overall, if you’re a Shopify beginner and this part of the tutorial is too much, you can ignore all the crazy theme optimizations for now. In my opinion, in order of importance is:
- Your product and offer, then
- Website, then
- Advertising.
Shopify Colors And Theme
This part will be quick, but important. In general, you want to keep your font to be very readable, and you’ll want to keep your main brand colors to be 1-to-3 colors only as a rule of thumb.
Here’s how you can customize it. In the same theme editor as the section above, click Theme Settings on the bottom left and click either Colors or Typography to edit the colors and font for your website.
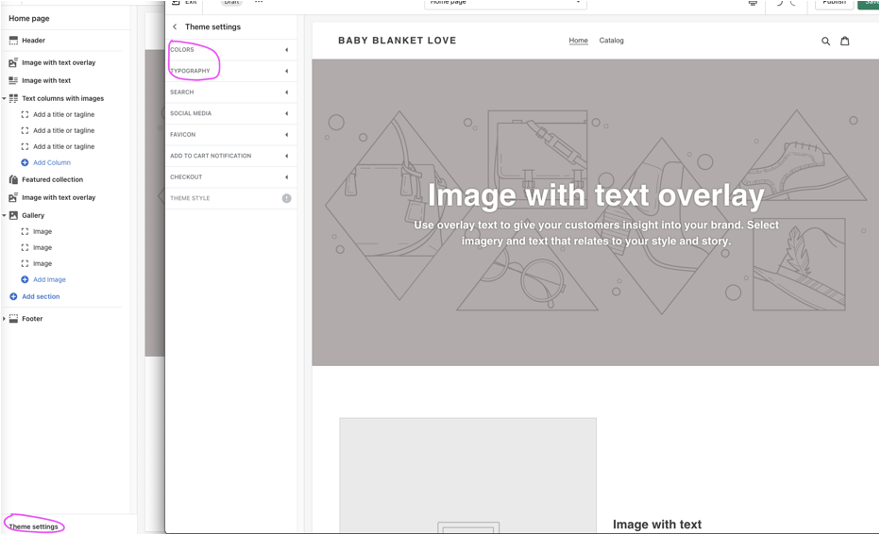
The typography settings are fairly straightforward, you just adjust the sizes and fonts and you can see it live on the right-hand side. Just adjust it so that it’s easy to read on both mobile and desktop.
The colors are a bit more difficult. There’s so much customization I find it easy just to change a color to a hot pink so I know what it’s changing, and then picking a color that fits into the website. In other words, the colors I just trial and error.
Adding Products
Go to your Shopify dashboard.
Click Products, then on the top right click Add product.

You’ll see this window.
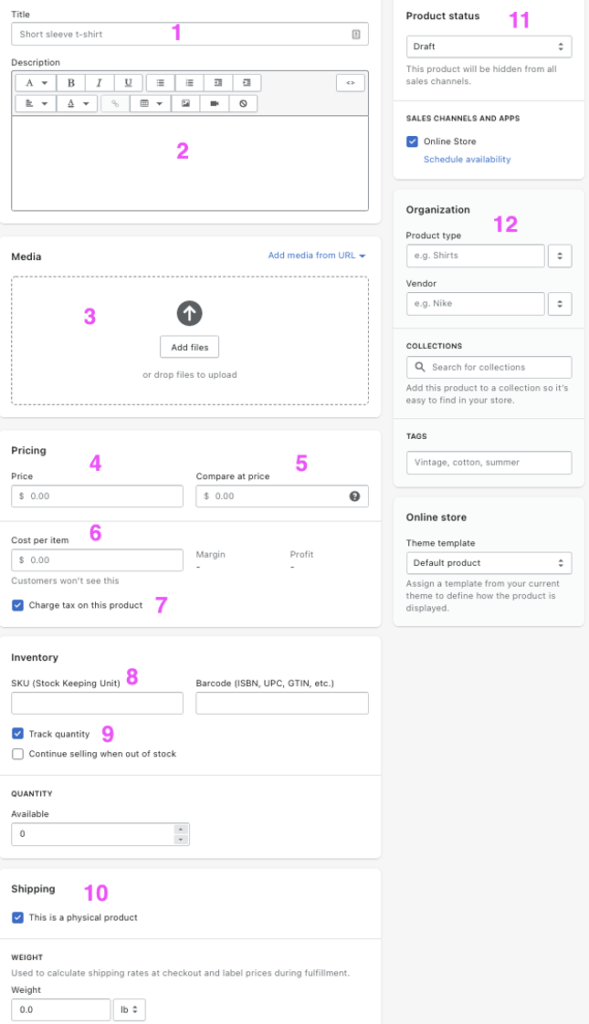
- Add a title to your product
- Add a description to your product
- Add photos, videos, 3d models to your product – you can just drag and drop your assets here.
- Add how much you want to charge your customer here.
- (Optional) add a “strikeout” price here. For example if you wanted to sell your item for $12 but have $20 crossed out next to it, you’d fill in “12” for price and “20” for compare at price.
- (Optional) How much does it cost you to source this item? This is just more for your tracking. But there’s other apps that track this so it’s optional.
- Do you want to charge tax on this product? If you hit an economic nexus, you might need to charge sales tax on your product depending on each state’s jurisdiction.
- SKU is a custom code. For example, if you’re selling pants you might say “blue-pants-33inch” as your SKU. This is just a tag you can assign to each item. This is important if you use DSers, Oberlo, or any integration with a 3PL because that’s sort of the only way they know which product you’d like to fulfill.
- If you plan on fulfilling yourself, then you’d want Shopify to track quantity. If you’re dropshipping or using a separate warehouse, you can uncheck this.
- Is this a physical product? This is mostly used to determine cost of pricing if you’re fulfilling the item yourself. I normally leave this unchecked since we use warehouses to do the shipping.
- Is this product still in “draft” or is it active? Active just means the product is live and anyone on your website can see the product. If it’s in draft it means nobody will see it and you’re still working on it.
- (Optional) The product type is just what kind of product it is, for your organization. The Vendor is just who you’re sourcing the product from. I leave this blank normally since we don’t sell a ton of different SKUs for example. But you may want a Vendor if you need to talk to lots of Vendors. A collection is just a line of items that you’re selling. For example, you might have a collection that’s dedicated to winter clothes and another that’s for summer clothes. I never really touch tags or Theme template.
Congratulations For Reaching The End Of The Shopify Tutorial For Beginners!
If you’ve gone through this entire tutorial for Shopify beginners, you now:
- Can create a Shopify store out of thin air.
- Know how to attach a customized domain to your Shopify store so you’ll have a branded website.
- Can setup a professional email so you don’t have to email your customers with an email that ends with @gmail.com
- Know the resource I use to set up a virtual phone number so you don’t have to use your personal phone number when talking to customers
- Know what Shopify apps are, and have a link to a detailed explanation of all the crucial Shopify apps I use to run a 6-figure store.
- Know how to customize the look and feel of your Shopify store. And you’ll also know which apps you might explore if you need more customization.
- Can add products to your website so that you can actually sell a product and make revenue.
In other words, if you followed this Shopify tutorial for beginners, you should now have a functioning website where you can sell actual goods to actual customers to make money online!
All you have to do now is go out there and make/find something to sell!
PS: There might be some affiliate links where if you click and sign up, I get paid some sum of money


0 Comments
Trackbacks/Pingbacks